
Red velvet cake and cheesecake—two of the most beloved desserts—come together in perfect harmony with this Baked Red Velvet Cheesecake recipe. The velvety, rich red velvet cake bottom pairs perfectly with the smooth, creamy, and tangy cheesecake topping. The result is a decadent dessert that is as visually stunning as it is delicious. Whether you’re celebrating a special occasion or just craving something indulgent, this cheesecake will be sure to impress!
The deep, vibrant red color of the cake and the luxurious cheesecake layer create a striking contrast, making this dessert a true showstopper. You can serve it on holidays, at dinner parties, or simply as a special treat for yourself. With just the right balance of flavors and textures, this Baked Red Velvet Cheesecake is destined to become a new favorite in your dessert repertoire.
Let’s dive into how to make this delicious treat!
Why You’ll Love This Recipe
1. Two Desserts in One
This recipe combines the best of both worlds—rich red velvet cake and creamy cheesecake—in one beautiful dessert. It’s perfect for those who can’t choose between the two!
2. Visually Stunning
The vibrant red of the red velvet cake and the smooth white cheesecake create a beautiful contrast that’s sure to wow your guests. It’s an ideal dessert for holidays or special occasions.
3. Decadent and Creamy
The cheesecake topping is rich and creamy, while the red velvet cake adds a moist and tender texture, making each bite a delightful experience.
4. Make-Ahead Dessert
This cheesecake can be made a day or two in advance, which makes it perfect for entertaining or prepping for a busy event. Just chill and serve when ready!
5. Customizable Toppings
You can easily customize the top of the cheesecake with whipped cream, fresh berries, or even a drizzle of chocolate or caramel for extra indulgence.

Ingredients
For the Red Velvet Cake Layer:
- All-purpose flour
- Cocoa powder
- Baking powder
- Salt
- Butter
- Sugar
- Eggs
- Buttermilk
- Red food coloring
- Vanilla extract
- Vinegar
For the Cheesecake Layer:
- Cream cheese (softened)
- Sour cream
- Sugar
- Eggs
- Vanilla extract
For the Crust (optional):
- Graham cracker crumbs
- Butter
- Sugar
Variations
- Gluten-Free: You can make this cheesecake gluten-free by swapping the all-purpose flour with a gluten-free flour blend and ensuring your crust ingredients are also gluten-free.
- Chocolate Drizzle: For an extra indulgent touch, drizzle the top of the cheesecake with melted chocolate or ganache.
- Fruit Toppings: Add fresh fruit, such as strawberries or raspberries, on top for a refreshing contrast to the richness of the cheesecake.
- Oreo Crust: If you love the flavor of chocolate cookies, you can use crushed Oreos instead of graham crackers for the crust.
How to Make the Recipe
Step 1: Prepare the Crust (Optional)
If you’re making a crust, preheat your oven to 325°F (163°C). In a bowl, combine the graham cracker crumbs, sugar, and melted butter. Press the mixture into the bottom of a springform pan. Bake for 10 minutes, then set aside to cool.
Step 2: Make the Red Velvet Cake Layer
In a bowl, whisk together the flour, cocoa powder, baking powder, and salt. In another bowl, beat the butter and sugar together until creamy. Add the eggs, one at a time, mixing well after each addition. Stir in the buttermilk, food coloring, vanilla extract, and vinegar until combined.
Gradually add the dry ingredients to the wet ingredients, mixing until smooth. Pour the red velvet batter into the prepared springform pan (over the crust, if using). Bake for 15-20 minutes, or until a toothpick inserted into the center comes out clean. Let the red velvet cake layer cool completely before adding the cheesecake layer.
Step 3: Make the Cheesecake Layer
In a large mixing bowl, beat the softened cream cheese and sugar until smooth. Add the sour cream and vanilla extract, mixing until fully incorporated. Add the eggs one at a time, beating well after each addition. Mix until the cheesecake batter is smooth and creamy.
Step 4: Assemble the Cheesecake
Once the red velvet cake layer has cooled completely, pour the cheesecake batter on top of the cake. Smooth the top with a spatula to ensure an even layer.
Step 5: Bake the Cheesecake
Bake the cheesecake in a preheated 325°F (163°C) oven for about 50-60 minutes, or until the cheesecake is set around the edges but still slightly jiggly in the center. If you gently shake the pan, the cheesecake should look firm but with a slight wobble.
Step 6: Cool and Chill
Let the cheesecake cool in the pan on a wire rack for 1 hour. Then, refrigerate for at least 4 hours, or preferably overnight, to allow it to set completely.
Step 7: Serve
Once chilled, run a knife around the edges of the pan to loosen the cheesecake. Carefully remove the springform pan and place the cheesecake on a serving platter. Top with whipped cream, berries, or any other toppings you prefer, then slice and serve.

Tips for Making the Recipe
- Let the Cake Cool Completely: Make sure the red velvet cake layer is completely cooled before adding the cheesecake layer. This helps prevent the cheesecake from cracking.
- Avoid Overbaking: Be sure not to overbake the cheesecake. The center should still have a slight jiggle when done, as it will continue to set as it cools.
- Room Temperature Ingredients: Make sure your cream cheese, eggs, and sour cream are at room temperature before making the cheesecake batter to avoid lumps.
- Water Bath (Optional): To avoid cracking, you can bake the cheesecake in a water bath. Simply wrap the outside of the springform pan with foil, place it in a larger pan, and fill the outer pan with water halfway up the sides of the springform pan.
How to Serve
Serve this Baked Red Velvet Cheesecake with a dollop of whipped cream, fresh fruit, or a drizzle of chocolate sauce for an extra touch of elegance. It’s perfect for any occasion, from special holidays to everyday indulgences.
Make Ahead and Storage
Storing Leftovers
Store any leftover cheesecake in an airtight container in the refrigerator for up to 3-4 days. This cheesecake is even better the next day as the flavors have more time to meld together.
Freezing
You can freeze slices of the cheesecake for up to 2-3 months. Wrap each slice tightly in plastic wrap and foil before placing them in a freezer-safe container. To thaw, place the cheesecake in the refrigerator overnight before serving.
Reheating
If you prefer to serve the cheesecake at room temperature, let it sit out for about 30 minutes before serving. There’s no need to reheat it, as this dessert is just as delicious when served cold.
FAQs
1. Can I use a different flavor cake layer?
Yes, you can substitute the red velvet cake with any other flavor cake, such as chocolate, vanilla, or even a marble cake.
2. Can I make this cheesecake ahead of time?
Absolutely! In fact, it’s recommended to make this cheesecake a day or two ahead to allow the flavors to develop and for it to set properly.
3. Can I freeze the entire cheesecake?
Yes, you can freeze the entire cheesecake. Just be sure to wrap it well in plastic wrap and foil to prevent freezer burn.
4. Can I use a different crust?
Yes, you can use a cookie crust (like an Oreo crust) instead of the graham cracker crust if you prefer.
5. Can I use store-bought red velvet cake mix?
Yes, you can use a store-bought red velvet cake mix to make things quicker, but homemade cake batter will yield the best flavor.
6. Can I make the cheesecake without a water bath?
Yes, a water bath helps prevent cracks, but you can skip it and still achieve a delicious cheesecake. Just be careful not to overbake it.
7. How can I prevent cracks in the cheesecake?
To prevent cracks, avoid overbaking, let the cheesecake cool gradually, and allow it to set in the fridge overnight.
8. How do I know when the cheesecake is done?
The edges should be set, but the center should still have a slight jiggle when you shake the pan gently. The cheesecake will continue to set as it cools.
9. Can I decorate the cheesecake?
Yes! You can decorate the cheesecake with whipped cream, berries, chocolate drizzle, or sprinkles to make it even more festive.
10. Can I use a different pan?
You can use any round baking pan, but a springform pan is ideal for easy removal and presentation.

Conclusion
This Baked Red Velvet Cheesecake is a show-stopping dessert that combines two beloved treats into one irresistible indulgence. With its velvety red velvet cake layer and creamy cheesecake topping, it’s the perfect dessert for any celebration or special occasion. Whether you serve it with fresh fruit, whipped cream, or a drizzle of chocolate, this cheesecake will undoubtedly steal the spotlight and leave everyone asking for the recipe. Enjoy!
Print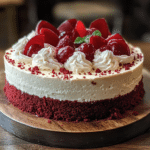
Bake Red Velvet Cheesecake Recipe
- Total Time: 1 hour 30 minutes (plus chilling time)
- Yield: 12 servings
- Diet: Vegetarian
Description
This Baked Red Velvet Cheesecake is the perfect combination of a rich, creamy cheesecake and the iconic red velvet cake flavor we all love. With a decadent cheesecake filling on a soft red velvet crust, topped with a smooth cream cheese frosting, it’s the ultimate dessert for Valentine’s Day, anniversaries, or any special occasion. Every bite is a velvety, indulgent treat that will wow your guests!
Ingredients
- Preheat the Oven:
Preheat your oven to 325°F (160°C). Grease and line the bottom of a 9-inch springform pan with parchment paper. - Prepare the Crust:
In a medium bowl, mix the graham cracker crumbs, sugar, melted butter, and cocoa powder (if using) until well combined. Press the mixture into the bottom of the prepared pan to form an even layer. Bake in the preheated oven for 8-10 minutes, then remove from the oven and set aside to cool. - Make the Red Velvet Cake Layer:
In a large bowl, whisk together the flour, sugar, baking powder, baking soda, salt, and cocoa powder. In a separate bowl, mix together the milk, oil, egg, vanilla extract, and food coloring. Combine the wet and dry ingredients, then stir in the vinegar. Mix until smooth and well combined. Pour the batter over the cooled crust and spread evenly. - Prepare the Cheesecake Layer:
In a large mixing bowl, beat the softened cream cheese with the sugar and vanilla extract until smooth and creamy. Add the eggs, one at a time, mixing well after each addition. Add the sour cream and flour, and beat until combined. Pour the cheesecake mixture over the red velvet cake layer, spreading evenly. - Bake the Cheesecake:
Bake the cheesecake in the preheated oven for 45-55 minutes, or until the edges are set and the center is slightly jiggly. The cheesecake will firm up as it cools. Allow the cheesecake to cool completely in the pan on a wire rack, then refrigerate for at least 4 hours or overnight for best results. - Prepare the Cream Cheese Frosting (Optional):
While the cheesecake is chilling, prepare the cream cheese frosting by beating the softened cream cheese and butter together until smooth. Gradually add powdered sugar and vanilla extract, and beat until fluffy. If the frosting is too thick, add heavy cream 1 tablespoon at a time to reach a spreadable consistency. - Serve:
Once the cheesecake is chilled and set, remove it from the springform pan. If desired, pipe or spread the cream cheese frosting over the top of the cheesecake. Slice and serve chilled for the best texture and flavor.
Instructions
- Preheat the Oven:
Preheat your oven to 325°F (160°C). Grease and line the bottom of a 9-inch springform pan with parchment paper. - Prepare the Crust:
In a medium bowl, mix the graham cracker crumbs, sugar, melted butter, and cocoa powder (if using) until well combined. Press the mixture into the bottom of the prepared pan to form an even layer. Bake in the preheated oven for 8-10 minutes, then remove from the oven and set aside to cool. - Make the Red Velvet Cake Layer:
In a large bowl, whisk together the flour, sugar, baking powder, baking soda, salt, and cocoa powder. In a separate bowl, mix together the milk, oil, egg, vanilla extract, and food coloring. Combine the wet and dry ingredients, then stir in the vinegar. Mix until smooth and well combined. Pour the batter over the cooled crust and spread evenly. - Prepare the Cheesecake Layer:
In a large mixing bowl, beat the softened cream cheese with the sugar and vanilla extract until smooth and creamy. Add the eggs, one at a time, mixing well after each addition. Add the sour cream and flour, and beat until combined. Pour the cheesecake mixture over the red velvet cake layer, spreading evenly. - Bake the Cheesecake:
Bake the cheesecake in the preheated oven for 45-55 minutes, or until the edges are set and the center is slightly jiggly. The cheesecake will firm up as it cools. Allow the cheesecake to cool completely in the pan on a wire rack, then refrigerate for at least 4 hours or overnight for best results. - Prepare the Cream Cheese Frosting (Optional):
While the cheesecake is chilling, prepare the cream cheese frosting by beating the softened cream cheese and butter together until smooth. Gradually add powdered sugar and vanilla extract, and beat until fluffy. If the frosting is too thick, add heavy cream 1 tablespoon at a time to reach a spreadable consistency. - Serve:
Once the cheesecake is chilled and set, remove it from the springform pan. If desired, pipe or spread the cream cheese frosting over the top of the cheesecake. Slice and serve chilled for the best texture and flavor.
Notes
- Make sure to allow the cheesecake to cool completely before refrigerating it to avoid cracks.
- You can skip the frosting if you prefer a less sweet option, but the cream cheese frosting adds a nice touch of tanginess that complements the sweetness of the red velvet layer.
- If you don’t have a springform pan, you can use a regular cake pan, but be sure to line it well with parchment paper for easy removal.
- Prep Time: 20 minutes
- Cook Time: 1 hour 10 minutes
- Category: Dessert, Valentine’s Day, Cake
- Method: Baking
- Cuisine: American