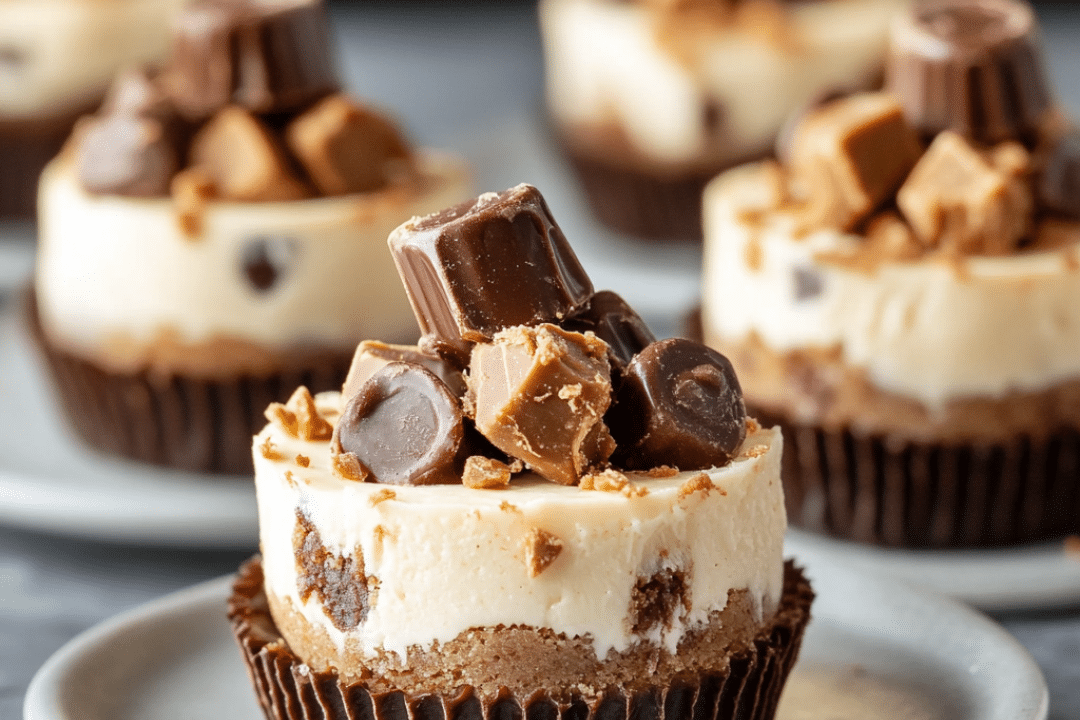
Mini Peanut Butter Cup Cheesecakes are the perfect combination of creamy, indulgent cheesecake and the rich, sweet flavor of peanut butter cups. These bite-sized desserts are ideal for any occasion, from holiday parties to casual get-togethers. With a simple, yet delicious filling made from cream cheese, sugar, vanilla, and sour cream, and topped with a mini peanut butter cup, these cheesecakes are sure to please both peanut butter lovers and cheesecake enthusiasts alike.
The mini size makes them perfect for portion control, and they’re easy to serve to a crowd. They’re a fun, creative spin on traditional cheesecakes that can be customized with various toppings or flavors. If you’re looking for a treat that is both decadent and easy to make, these mini cheesecakes are the way to go.
Why You’ll Love This Recipe
1. Perfectly Portion-Sized
These mini cheesecakes are individually sized, making them perfect for serving at parties or gatherings. No need to cut slices—just grab one and enjoy!
2. Peanut Butter Cup Surprise
Each cheesecake features a mini peanut butter cup baked right into the base, adding a delightful surprise and an extra layer of sweetness.
3. Simple to Make
With just a few ingredients and easy steps, you can make these cheesecakes in no time. No need for a complicated crust or fancy equipment—just mix and bake!
4. Deliciously Creamy
The creamy, smooth filling is perfectly balanced with the richness of the peanut butter cup, making each bite a decadent treat.
5. Customizable
These cheesecakes can be customized with different toppings like chocolate drizzle, whipped cream, or extra peanut butter cups. You can easily make them your own!
Ingredients
- Mini peanut butter cups
- Cream cheese (softened)
- Sugar
- Vanilla extract
- Egg
- Sour cream
Variations
- Chocolate Topping: Drizzle melted chocolate over the mini cheesecakes before serving for an extra layer of indulgence.
- Caramel Drizzle: Add a caramel drizzle for a sweet and salty twist.
- Fruit Topping: Top with sliced strawberries, raspberries, or blueberries for a fruity contrast to the peanut butter.
- Add More Candy: Crush up additional mini peanut butter cups and sprinkle them on top for a fun, crunchy topping.
How to Make the Recipe
Step 1: Preheat the Oven
Preheat your oven to 325°F (163°C).
Step 2: Prepare the Muffin Tin
Line a mini muffin tin with paper liners. Place one mini peanut butter cup in the bottom of each liner.
Step 3: Prepare the Cheesecake Filling
In a mixing bowl, beat together the softened cream cheese, sugar, and vanilla extract until smooth and creamy.
Step 4: Add Egg and Sour Cream
Add the egg and beat until combined. Then, stir in the sour cream until the mixture is fully incorporated.
Step 5: Spoon the Filling
Spoon the cheesecake mixture over the peanut butter cups in each muffin liner, filling each about 3/4 full.
Step 6: Bake the Cheesecakes
Place the tin in the preheated oven and bake for 15-18 minutes, or until the edges are set and the center is slightly jiggly.
Step 7: Cool and Chill
Allow the mini cheesecakes to cool in the tin for 10 minutes, then transfer to the refrigerator to chill for at least 2 hours, or until fully set.
Step 8: Serve and Enjoy
Once the cheesecakes are chilled, remove them from the muffin tin, and serve. You can top them with extra peanut butter cups, chocolate, or caramel if desired.
Tips for Making the Recipe
- Soften Cream Cheese: Make sure your cream cheese is softened to room temperature to avoid lumps in the cheesecake mixture.
- Don’t Overbake: These cheesecakes cook quickly, so keep an eye on them. They should be set on the edges but still a bit wobbly in the center.
- Chill Well: Allow enough time for the cheesecakes to chill fully in the fridge for the best texture and flavor.
- Room Temperature Ingredients: Let your egg and sour cream come to room temperature before adding them to the mixture for a smoother consistency.
How to Serve
These mini cheesecakes are best served chilled. You can serve them as they are or top them with additional mini peanut butter cups, whipped cream, or a drizzle of chocolate or caramel. They’re perfect for a dessert platter or as a sweet treat to accompany coffee or tea.
Make Ahead and Storage
Storing Leftovers
Store any leftover mini cheesecakes in an airtight container in the refrigerator for up to 3 days.
Freezing
You can freeze these cheesecakes for longer storage. Wrap each mini cheesecake tightly in plastic wrap and place them in a freezer-safe container or bag. They can be frozen for up to 2 months. Thaw in the refrigerator before serving.
Reheating
These cheesecakes are best served chilled, so there’s no need to reheat. Just remove from the fridge and enjoy!
FAQs
1. Can I use regular-sized peanut butter cups?
Yes, you can use regular-sized peanut butter cups, but you will need to cut them in half to fit in the mini muffin tin.
2. Can I use low-fat cream cheese?
Yes, you can substitute low-fat cream cheese, though the texture may be slightly different from the full-fat version.
3. Can I add chocolate chips to the filling?
Absolutely! You can fold in some mini chocolate chips for extra chocolatey goodness.
4. How do I know when they are done?
The mini cheesecakes should be set around the edges but still slightly wobbly in the center. They will firm up as they cool.
5. Can I make this recipe in a regular-sized muffin tin?
Yes, you can use a standard muffin tin, but you may need to adjust the baking time. Bake for 20-25 minutes or until they are set.
6. Can I make these without sour cream?
Yes, you can substitute sour cream with Greek yogurt for a slightly tangier flavor.
7. Can I add other candy inside the cheesecakes?
Feel free to experiment! Try adding crushed Oreos, chocolate chips, or even caramel candies inside the cheesecakes.
8. How long do they need to chill in the fridge?
The mini cheesecakes need to chill for at least 2 hours, but overnight is even better for a firmer texture.
9. Can I use a different flavor of candy?
Yes, you can substitute mini peanut butter cups with other small candies like mini chocolate bars or caramel-filled candies.
10. Can I make the filling ahead of time?
Yes, you can prepare the cheesecake filling ahead of time and store it in the refrigerator for up to 24 hours before baking.
Conclusion
These Mini Peanut Butter Cup Cheesecakes are a perfect treat for peanut butter and cheesecake lovers alike. With a creamy, smooth filling and the irresistible addition of mini peanut butter cups, these little desserts are both indulgent and easy to make. Whether you’re hosting a party or looking for a fun, bite-sized dessert, these cheesecakes are sure to impress. Try them out, and enjoy the creamy, peanut-buttery goodness!
Print
Mini Peanut Butter Cup Cheesecakes
- Total Time: 35-40 minutes
- Yield: 1 large cookie cake (serves about 8-10) 1x
Description
Indulge in this giant, chewy chocolate peanut butter cookie cake. It combines the rich flavor of creamy peanut butter with melty chocolate chips in a soft, large cookie that’s baked into a cake shape. Perfect for celebrations, special occasions, or just a delicious treat to share with friends and family.
Ingredients
- 1 cup all-purpose flour
- 1/2 teaspoon baking soda
- 1/4 teaspoon salt
- 1/2 cup unsalted butter, softened
- 1/2 cup granulated sugar
- 1/2 cup packed brown sugar
- 1/2 cup creamy peanut butter
- 1 large egg
- 1 teaspoon vanilla extract
- 1 cup chocolate chips
Instructions
- Preheat oven to 350°F (175°C). Grease a 9-inch round cake pan.
- In a medium bowl, whisk together flour, baking soda, and salt.
- In a large bowl, cream together the softened butter, granulated sugar, and brown sugar until smooth and fluffy.
- Add the creamy peanut butter, egg, and vanilla extract. Mix until fully combined.
- Gradually add the dry ingredients to the wet ingredients, stirring until just combined.
- Fold in the chocolate chips.
- Spread the dough evenly into the prepared cake pan.
- Bake for 18-22 minutes, or until the center is set and the edges are golden.
- Allow the cookie cake to cool in the pan for about 10 minutes, then transfer it to a wire rack to cool completely.
- Slice and serve, optionally garnished with additional peanut butter or chocolate drizzle.
Notes
- For an extra indulgent treat, top the cooled cookie cake with a scoop of vanilla ice cream.
- You can add chopped peanuts for an extra crunch and a boost of peanut flavor.
- This cookie cake can also be decorated with frosting if desired, especially for birthdays or special events.
- Prep Time: 15 minutes
- Cook Time: 18-22 minutes

